How to Mount Betta Fish Automatic Feeder on Tank
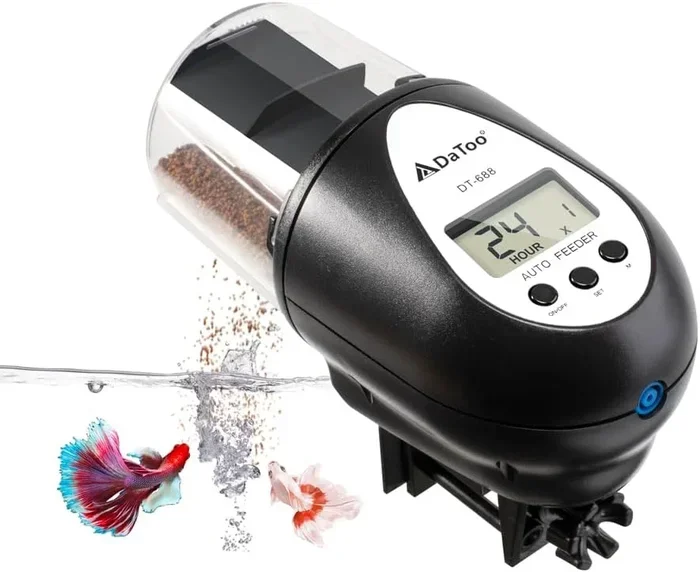
Mounting a betta fish automatic feeder on your tank is easier than you think, and it can transform your feeding routine. This guide walks you through choosing the right feeder, positioning it correctly, and avoiding common mistakes that cause overfeeding or tank mess. You will learn practical tips to keep your betta healthy and your tank clean.
Key Takeaways
- Choose the right feeder type: Suction cup and clip-on feeders are the most popular options for betta tanks.
- Mount at the correct height: Place the feeder just above the waterline for easy dispensing and minimal mess.
- Adjust portion sizes: Set the feeder to release small amounts to prevent overfeeding and keep water quality high.
- Clean regularly: A dirty feeder can contaminate food and harm your betta fish.
- Test before relying on it: Always run a trial run to make sure the feeder works properly before leaving your betta unattended.
- Combine with proper tank setup: A well-planned tank makes feeder placement much easier and more effective.
📑 Table of Contents
- Why You Should Mount a Betta Fish Automatic Feeder on Tank
- Choosing the Right Automatic Feeder for Your Betta Tank
- Where to Mount the Feeder on Your Betta Tank
- Step-by-Step Guide to Mounting Your Automatic Feeder
- Common Mistakes to Avoid When Mounting a Betta Feeder
- Maintaining Your Automatic Feeder for Long-Term Use
- How an Automatic Feeder Fits Into Your Betta Tank Setup
- Final Thoughts on Mounting Your Betta Fish Automatic Feeder
Why You Should Mount a Betta Fish Automatic Feeder on Tank
Keeping a betta fish healthy means feeding it consistently. But life gets busy. You go on vacation. You work long hours. You forget to feed your fish sometimes. An automatic feeder solves all of these problems. It dispenses food at set times so your betta stays fed even when you are not around.
But here is the thing. The feeder only works well if you mount it correctly. A poorly mounted feeder can spill food into the tank. It can tilt and jam. It can even fall into the water and make a mess. That is why learning how to mount betta fish automatic feeder on tank properly matters so much.
In this guide, we will walk you through every step. You will learn about different feeder types, the best mounting spots, and how to avoid mistakes. Whether you are a beginner or a seasoned betta keeper, this article has something for you.
Choosing the Right Automatic Feeder for Your Betta Tank
Not all feeders are created equal. Before you mount anything, you need to pick the right one. The wrong feeder can cause overfeeding, underfeeding, or constant clogging.
Suction Cup Feeders
Suction cup feeders are the most popular choice for betta tanks. They stick directly to the glass wall using a vacuum seal. Most models come with adjustable food ports so you can control how much food comes out. They work well for both dry flakes and small pellets.
The main advantage of a suction cup feeder is that it stays firmly in place. It does not slide around or tip over. However, you need to make sure the glass is clean where you attach it. Dirt or algae can break the suction seal.
Clip-On Feeders
Clip-on feeders attach to the rim of the tank instead of the glass. They are a great option if you have a tank with textured glass or silicone seams where suction cups will not hold. These feeders hang over the tank and dispense food through a small opening.
Clip-on feeders are easy to install and remove. The downside is that they can shift if the tank rim is not wide enough. Always check the clip size before buying.
Magnetic Feeders
Magnetic feeders are a newer option. They attach to the outside of the tank using magnets. You can easily remove them for cleaning. They look sleek and do not take up any internal tank space.
However, magnetic feeders can be more expensive. They also may not work well on very thick tank walls. For most betta setups, a suction cup or clip-on feeder will do the job just fine.
| Feeder Type | Mounting Method | Best For | Price Range |
|---|---|---|---|
| Suction Cup | Sticks to glass wall | Standard glass tanks | $8 – $20 |
| Clip-On | Clips to tank rim | Tanks with textured glass | $10 – $25 |
| Magnetic | Attaches to outside wall | Premium setups | $20 – $40 |
Where to Mount the Feeder on Your Betta Tank
Placement matters a lot. Where you mount the feeder affects how well it works and how clean your tank stays. You cannot just stick it anywhere and expect good results.
Near the Back Glass Wall
The best spot for most feeders is near the back glass wall of the tank. This keeps the feeder out of your betta’s main swimming area. It also keeps the food dispensing area away from decorations and plants that might block the food from falling into the water.
Mounting near the back wall also makes the feeder less visible. Your tank will look cleaner and more natural without a big plastic device sitting in the middle.
At the Right Height Above the Waterline
The feeder should sit just above the waterline. The food dispensed needs to fall directly into the water. If the feeder is too high, food pieces will bounce off the surface and scatter around the tank. If it is too low, it might dip into the water and get wet, which can cause the food to clump and clog the mechanism.
A good rule of thumb is to position the dispenser opening about one to two inches above the water surface. This gives the food enough time to drop cleanly into the tank.
Avoid Direct Light and Heat Sources
Do not mount the feeder right next to your aquarium light or heater. Heat can dry out the food in the feeder too quickly. Light can cause algae to grow on the feeder, making it harder to clean. Keep the feeder in a shaded spot on the tank.
Step-by-Step Guide to Mounting Your Automatic Feeder
Now that you know the best placement, let us get into the actual mounting process. Follow these steps carefully for a secure and effective setup.
Step 1: Clean the Mounting Area
Before you attach anything, clean the glass or rim where the feeder will go. Use a soft algae pad or cloth to remove any dirt, algae, or residue. A clean surface ensures the suction cup or clip gets a strong hold.
Step 2: Attach the Feeder Securely
Press the suction cup firmly against the glass and hold it for about ten seconds. For clip-on feeders, open the clip, slide it onto the tank rim, and tighten it until it feels snug. The feeder should not wobble or shift when you touch it gently.
Step 3: Load the Food Reservoir
Open the feeder and add your betta food. Use only the amount you plan to dispense over a few days. Do not overfill the reservoir. Excess food can spoil faster and cause clogging. Dry flakes and small betta pellets work best in most automatic feeders.
Step 4: Adjust the Dispensing Settings
Set the portion size and feeding schedule according to your betta’s needs. Most betta fish do well with two small feedings per day. Start with a small portion and adjust based on how much your betta eats. You want to avoid any leftover food sinking to the bottom.
Step 5: Test the Feeder
Run a full test cycle before you trust the feeder. Watch it dispense food and check that the food drops cleanly into the water. Make sure no food gets stuck or falls outside the tank. Run at least two full cycles to confirm everything works.
Step 6: Monitor the First Few Days
After mounting, keep an eye on the feeder for the first few days. Check the food levels, the dispensing mechanism, and the water around the feeder for any excess food. If you notice any issues, adjust the position or portion settings right away.
Common Mistakes to Avoid When Mounting a Betta Feeder
Even experienced fish keepers make mistakes with automatic feeders. Here are the most common ones and how to avoid them.
Overfeeding is the number one mistake. People set the feeder to dispense too much food. Betta fish have small stomachs. They only need a few pellets or a small pinch of flakes per feeding. Overfeeding leads to uneaten food sinking to the bottom, which ruins your water quality fast. If you are unsure about portion sizes, check your betta feeding guide for vacation to get the right amounts dialed in.
Mounting the feeder too low is another big error. If the dispenser sits at or below the waterline, moisture gets into the food reservoir. This causes the food to swell and clog the mechanism. Always keep the feeder above the water surface with the opening aimed directly into the tank.
Skipping regular cleaning is a mistake many people make. Food residue builds up inside the feeder over time. Mold and bacteria can grow in the food chamber. Remove the feeder every two weeks and give it a thorough rinse with warm water. Never use soap or chemicals since residue can harm your fish.
Using the wrong food type causes jams. Not all foods work well in automatic feeders. Large pellets or thick flakes can clog the dispensing mechanism. Use small, dry betta pellets or crushed flakes that match the feeder’s opening size.
Forgetting to secure the feeder properly leads to accidents. A loose suction cup or clip can cause the feeder to fall. This wastes food and can crack the tank glass if it hits hard enough. Always double-check the mount after installation.
Maintaining Your Automatic Feeder for Long-Term Use
A good automatic feeder lasts for months or even years with proper care. Regular maintenance keeps it working smoothly and protects your betta’s health.
Every two weeks, disassemble the feeder and rinse all parts in warm water. Use a small brush or cotton swab to clean out the food dispensing mechanism. Check for any worn or cracked parts and replace them as needed. If you notice algae buildup on the suction cup, clean it with a vinegar soak to restore the grip.
It is also a good idea to test the feeder’s batteries or power connection monthly. A feeder that stops working mid-cycle can leave your betta without food for days. Keep spare batteries on hand and replace them before they run completely dead.
Finally, remember that an automatic feeder is a tool, not a replacement for hands-on care. You should still perform regular betta fish tank cleaning and water changes. The feeder handles the feeding part, but the tank itself still needs your attention.
How an Automatic Feeder Fits Into Your Betta Tank Setup
An automatic feeder works best when it is part of a well-planned tank setup. If you have not yet set up your betta tank, think about where the feeder will go from the beginning. A good setup includes proper filtration, heating, lighting, and plenty of hiding spots.
When you plan your tank layout, leave a clear section of glass on the back or side wall for the feeder. Avoid placing it near dense plants or decorations that might block the food path. A clean, open wall area makes the best mounting spot.
If you are setting up a new tank, you can find detailed guidance on setting up a fish tank for betta fish to make sure everything, including the feeder, is positioned correctly from day one.
The feeder also plays a role in your overall fish tank maintenance routine. By dispensing controlled portions, it reduces leftover food and waste. This means less debris on the substrate, less ammonia buildup, and cleaner water. Your betta stays healthier, and you spend less time doing water changes.
Final Thoughts on Mounting Your Betta Fish Automatic Feeder
Mounting a betta fish automatic feeder on tank is a simple process that pays off big time. You get peace of mind when you are away from home. Your betta gets fed on a consistent schedule. And your tank stays cleaner because the food portions are controlled.
The key is to choose the right feeder, mount it at the correct height, and maintain it regularly. Avoid the common mistakes we covered, and you will have a reliable feeding system that works for months. Your betta will thank you with vibrant colors and active behavior.
Take your time with the setup. Test everything before you leave your fish unattended. And remember, the feeder is just one part of keeping a healthy betta tank. Combine it with proper tank maintenance and you will create a great home for your fish.
Frequently Asked Questions
Can I mount the automatic feeder on a curved betta tank?
Suction cup feeders work best on flat glass surfaces. Curved tanks can make it difficult for suction cups to hold securely. In this case, a clip-on feeder that attaches to the tank rim is a better option. It will grip the rim regardless of the glass shape.
How long can a betta fish go without food if the feeder malfunctions?
A healthy adult betta can survive three to five days without food. However, you should never rely on this as a plan. Always test the feeder before leaving and have a backup feeding method ready just in case.
What type of food works best in an automatic feeder for bettas?
Small, dry betta pellets and crushed flakes work best. Avoid freeze-dried foods that expand when wet, as they can clog the dispensing mechanism. Look for food specifically designed for automatic feeders if possible.
Should I mount the feeder near the filter intake?
No. Mounting the feeder near the filter intake can cause the dispensed food to be sucked into the filter before your betta can eat it. Place the feeder at least a few inches away from the filter output and intake areas.
How do I know if my betta is getting enough food from the automatic feeder?
Watch your betta during feeding times. It should eat within a few minutes of the food being dispensed. If food remains uneaten, reduce the portion size. You can also check the tank for leftover food after each feeding cycle.
Can I use the automatic feeder for a betta fry tank?
Yes, but you will need to adjust the portion size significantly. Betta fry need very small amounts of food multiple times a day. Use a feeder that allows fine portion control and consider using specialized fry food that is small enough to pass through the dispensing mechanism.